
Introduce to Kubernetes
Kubernetes
Table of Contents
- Introduction
- Kubernetes Architechture
- Kubernetes Cluster
- Node Service
- Kubernetes Object Model
- Volumes
- Basic commands
- Check the Information of Cluster
- Node Commands
- Kubernetes Deployment
- Check
podand workingnode - Expose Applications
- Running Multople Instances of Apps
- Performing a Rolling Update
- Deploying an Application Using the Dashboard
- Deploying an Application Using the CLI
- Exposing an Application
- Accessing an Application
- 2021 Update:
Kubernetes is a portable, extensible, open source platform for managing containerized workloads and services, that facilitates both declarative configuration and automation. It has a large, rapidly growing ecosystem. Kubernetes services, support, and tools are widely available.
Introduction
In Development (Dev) environments, running containers on a single host for development and testing of applications may be an option. However, when migrating to Quality Assurance (QA) and Production (Prod) environments, that is no longer a viable option because the applications and services need to meet specific requirements:
- Fault-tolerance
- On-demand scalability
- Optimal resource usage
- Auto-discovery to automatically discover and communicate with each other
- Accessibility from the outside world
- Seamless updates/rollbacks without any downtime.
Container orchestrators are tools which group systems together to form clusters where containers’ deployment and management is automated at scale while meeting the requirements mentioned above.
Most container orchestrators can be deployed on the infrastructure of our choice - on bare metal, Virtual Machines, on-premise, or the public cloud. Kubernetes, for example, can be deployed on a workstation, with or without a local hypervisor such as Oracle VirtualBox, inside a company’s data center, in the cloud on AWS Elastic Compute Cloud (EC2) instances, Google Compute Engine (GCE) VMs, DigitalOcean Droplets, OpenStack, etc. Kubernetes is an open-source system for automating deployment, scaling, and management of containerized applications. It has the following features:
Automatic bin packing: Kubernetes automatically schedules containers based on resource needs and constraints, to maximize utilization without sacrificing availability.
Horizontal scaling: With Kubernetes applications are scaled manually or automatically based on CPU or custom metrics utilization.
Service discovery and Load balancing: Containers receive their own IP addresses from Kubernetes, while it assigns a single Domain Name System (DNS) name to a set of containers to aid in load-balancing requests across the containers of the set.
Automated rollouts and rollbacks: Kubernetes seamlessly rolls out and rolls back application updates and configuration changes, constantly monitoring the application’s health to prevent any downtime.
Secret and configuration management: Kubernetes manages secrets and configuration details for an application separately from the container image, in order to avoid a re-build of the respective image. Secrets consist of confidential information passed to the application without revealing the sensitive content to the stack configuration, like on GitHub.
Storage orchestration: Kubernetes automatically mounts software-defined storage (SDS) solutions to containers from local storage, external cloud providers, or network storage systems.
Batch execution: Kubernetes supports batch execution, long-running jobs, and replaces failed containers.
Kubernetes Architechture
At a very high level, Kubernetes has the following main components:
One or more master nodes
One or more worker nodes
Distributed key-value store, such as etcd.
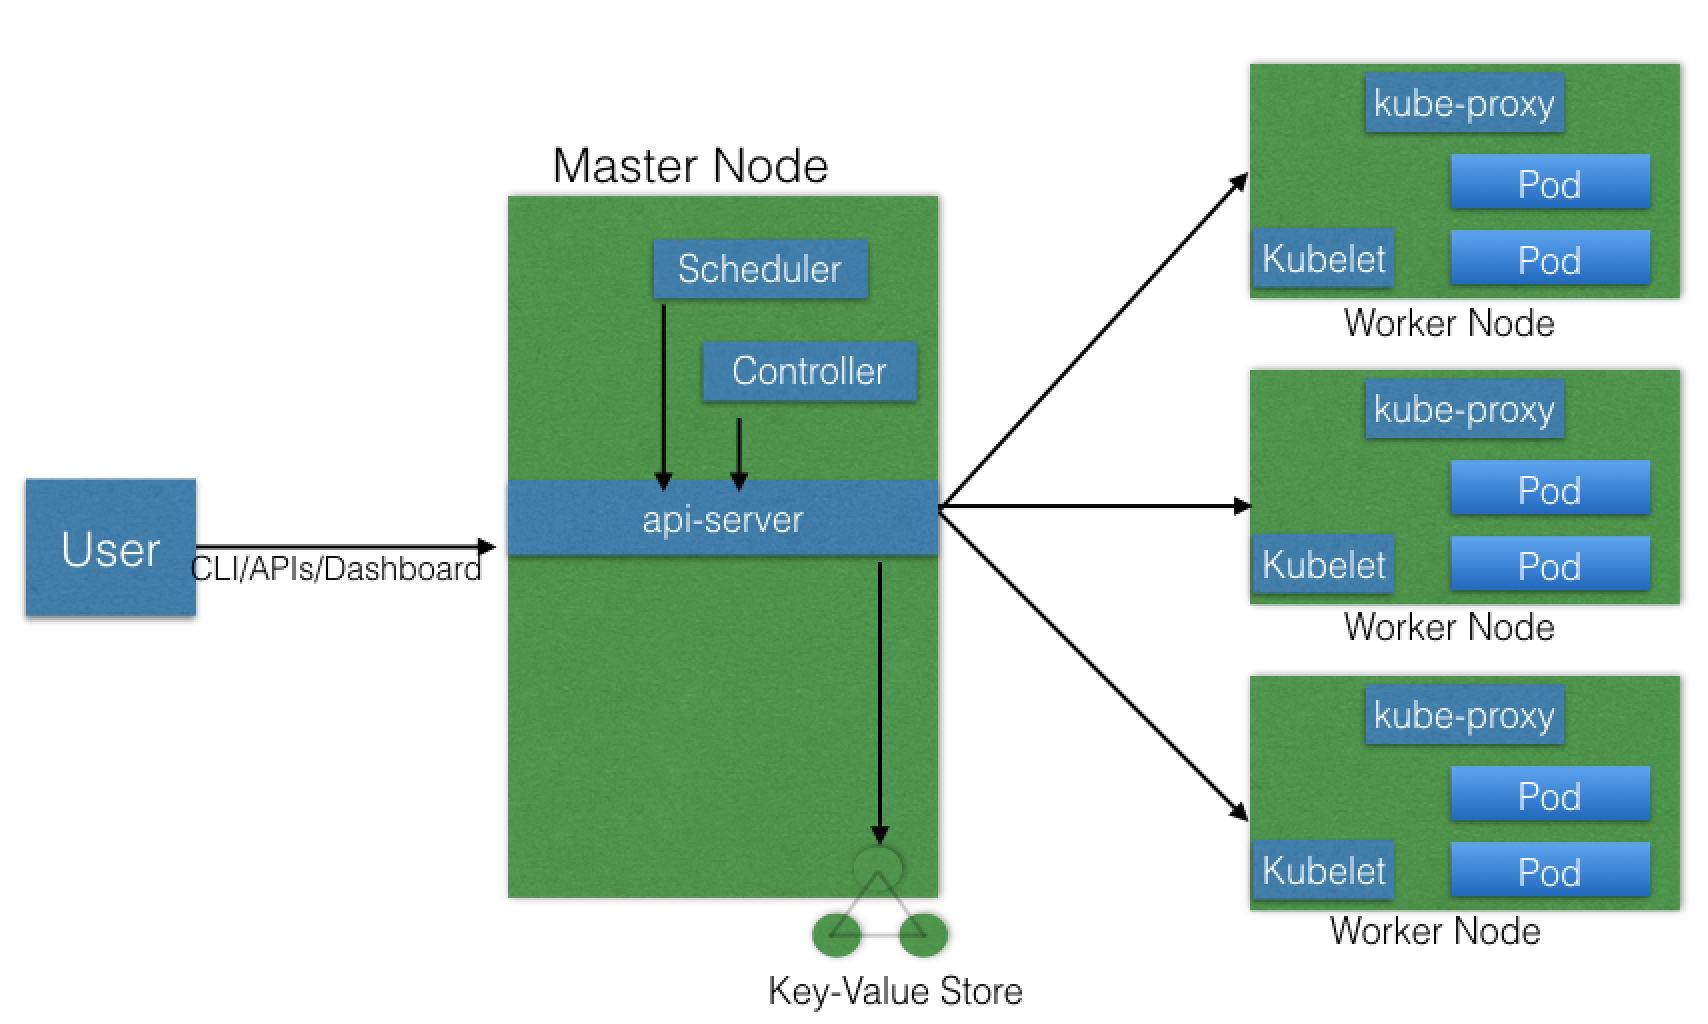
Master node
The master node provides a running environment for the control plane responsible for managing the state of a Kubernetes cluster, and it is the brain behind all operations inside the cluster. The control plane components are agents with very distinct roles in the cluster’s management. In order to communicate with the Kubernetes cluster, users send requests to the master node via a Command Line Interface (CLI) tool, a Web User-Interface (Web UI) Dashboard, or Application Programming Interface (API). To persist the Kubernetes cluster’s state, all cluster configuration data is saved to etcd. However, etcd is a distributed key-value store which only holds cluster state related data, no client workload data. etcd is configured on the master node (stacked) or on its dedicated host (external) to reduce the chances of data store loss by decoupling it from the control plane agents. A master node has the following components:
- API server
- Scheduler
- Controller managers
- etcd
API server: All the administrative tasks are coordinated by the kube-apiserver, a central control plane component running on the master node. The API server intercepts RESTful calls from users, operators and external agents, then validates and processes them.
The role of the kube-scheduler is to assign new objects, such as pods, to nodes. During the scheduling process, decisions are made based on current Kubernetes cluster state and new object’s requirements.
The controller managers are control plane components on the master node running controllers to regulate the state of the Kubernetes cluster.
etcd is a distributed key-value data store used to persist a Kubernetes cluster’s state. New data is written to the data store only by appending to it, data is never replaced in the data store. Obsolete data is compacted periodically to minimize the size of the data store.Out of all the control plane components, only the API server is able to communicate with the etcd data store.
Worker Node
A worker node provides a running environment for client applications. Through containerized microservices, these applications are encapsulated in Pods, controlled by the cluster control plane agents running on the master node. Pods are scheduled on worker nodes, where they find required compute, memory and storage resources to run, and networking to talk to each other and the outside world. A Pod is the smallest scheduling unit in Kubernetes. It is a logical collection of one or more containers scheduled together.
A worker node has the following components:
Container runtime
kubelet
kube-proxy
Addons for DNS, Dashboard, cluster-level monitoring and logging

Container Runtime
Although Kubernetes is described as a “container orchestration engine”, it does not have the capability to directly handle containers. In order to run and manage a container’s lifecycle, Kubernetes requires a container runtime on the node where a Pod and its containers are to be scheduled. Kubernetes supports docker and many other container runtimes.
Docker - although a container platform which uses containerd as a container runtime, it is the most widely used container runtime with Kubernetes
CRI-O - a lightweight container runtime for Kubernetes, it also supports Docker image registries containerd - a simple and portable container runtime providing robustness
rkt - a pod-native container engine, it also runs Docker images
rktlet - a Kubernetes Container Runtime Interface (CRI) implementation using rkt.
Kubelet
The kubelet is an agent running on each node and communicates with the control plane components from the master node. It receives Pod definitions, primarily from the API server, and interacts with the container runtime on the node to run containers associated with the Pod. It also monitors the health of the Pod’s running containers.
The kubelet connects to the container runtime using Container Runtime Interface (CRI). CRI consists of protocol buffers, gRPC API, and libraries.

As shown above, the kubelet acting as grpc client connects to the CRI shim acting as grpc server to perform container and image operations. CRI implements two services: ImageService and RuntimeService. The ImageService is responsible for all the image-related operations, while the RuntimeService is responsible for all the Pod and container-related operations.
Kubelet - CRI shims
- dockershim
With dockershim, containers are created using Docker installed on the worker nodes. Internally, Docker uses containerd to create and manage containers.

- cri-containerd
With cri-containerd, we can directly use Docker’s smaller offspring containerd to create and manage containers.

Kube-proxy
The kube-proxy is the network agent which runs on each node responsible for dynamic updates and maintenance of all networking rules on the node. It abstracts the details of Pods networking and forwards connection requests to Pods.
Networking chanllenges
Decoupled microservices based applications rely heavily on networking in order to mimic the tight-coupling once available in the monolithic era. Networking, in general, is not the easiest to understand and implement. Kubernetes is no exception - as a containerized microservices orchestrator is needs to address 4 distinct networking challenges:
Container-to-container communication inside Pods
Pod-to-Pod communication on the same node and across cluster nodes
pod-to-Service communication within the same namespace and across cluster namespaces
External-to-Service communication for clients to access applications in a cluster.
All these networking challenges must be addressed before deploying a Kubernetes cluster.
Container to Container Communication Inside Pods
Making use of the underlying host operating system’s kernel features, a container runtime creates an isolated network space for each container it starts. On Linux, that isolated network space is referred to as a network namespace. A network namespace is shared across containers, or with the host operating system.
When a Pod is started, a network namespace is created inside the Pod, and all containers running inside the Pod will share that network namespace so that they can talk to each other via localhost.
Pod-to-Pod Communication Across Nodes
In a Kubernetes cluster Pods are scheduled on nodes randomly. Regardless of their host node, Pods are expected to be able to communicate with all other Pods in the cluster, all this without the implementation of Network Address Translation (NAT). This is a fundamental requirement of any networking implementation in Kubernetes.
The Kubernetes network model aims to reduce complexity, and it treats Pods as VMs on a network, where each VM receives an IP address - thus each Pod receiving an IP address. This model is called “IP-per-Pod” and ensures Pod-to-Pod communication, just as VMs are able to communicate with each other. 
Pod-to-External World Communication
For a successfully deployed containerized applications running in Pods inside a Kubernetes cluster, it requires accessibility from the outside world. Kubernetes enables external accessibility through services, complex constructs which encapsulate networking rules definitions on cluster nodes. By exposing services to the external world with kube-proxy, applications become accessible from outside the cluster over a virtual IP.
Kubernetes Cluster
Kubernetes coordinates a cluster of highly available computers, each of which works as a separate unit connected to each other. The abstractions in Kubernetes allow you to deploy containerized applications to clusters without binding them to a particular standalone computer.
To use this new deployment model, applications need to be packaged in a way that separates them from a single host: they need to be containerized. Containerized applications are more flexible and usable than the old deployment model, where applications are deeply integrated with the host directly in packages. Kubernetes distributes automatically and dispathes containers over clusters in a highly-effecient way.
One Kubernetes cluster contains two kinds of sources:
Master: To dispatch the whole cluster. The Master coordinates all activities in the cluster, such as scheduling the application, maintaining the required state of the application, scaling the application, and rolling out new updates.
Nodes: In charge of running applications. It is a virtual machine or a physical machine, it plays the role like a tool machine. Every Node has its own Kublet, which is in charge of the Node and it is the communication proxy of the Node and the master. Node also has the tool operating upon containers, such as
Dockerorrkt. A Kubernetes cluster that handles production-level traffic should have at least three nodes.
Master: In charge of cluster,Node: In charge of the running applications.
When deploy applications on Kubernetes, the user tells Master to generate the application containerse. The, Master arrange the containers to operate on the Node of the cluster. Node communicate with Master by using the Kubernetes API exposed by the Master. The terminal user can also interact with the cluster by Kubernetes API.

Node Service
Kubernetes Pods are mortal. Pods in fact have a lifecycle. When a worker node dies, the Pods running on the Node are also lost. A ReplicaSet might then dynamically drive the cluster back to desired state via creation of new Pods to keep your application running. As another example, consider an image-processing backend with 3 replicas. Those replicas are exchangeable; the front-end system should not care about backend replicas or even if a Pod is lost and recreated. That said, each Pod in a Kubernetes cluster has a unique IP address, even Pods on the same Node, so there needs to be a way of automatically reconciling changes among Pods so that your applications continue to function.
A Service in Kubernetes is an abstraction which defines a logical set of Pods and a policy by which to access them. Services enable a loose coupling between dependent Pods. A Service is defined using YAML (preferred) or JSON, like all Kubernetes objects. The set of Pods targeted by a Service is usually determined by a LabelSelector (see below for why you might want a Service without including selector in the spec).
Although each Pod has a unique IP address, those IPs are not exposed outside the cluster without a Service. Services allow your applications to receive traffic. Services can be exposed in different ways by specifying a type in the ServiceSpec:
ClusterIP (default) - Exposes the Service on an internal IP in the cluster. This type makes the Service only reachable from within the cluster.
NodePort - Exposes the Service on the same port of each selected Node in the cluster using NAT. Makes a Service accessible from outside the cluster using
<NodeIP>:<NodePort>. Superset of ClusterIP.LoadBalancer - Creates an external load balancer in the current cloud (if supported) and assigns a fixed, external IP to the Service. Superset of NodePort.
ExternalName - Exposes the Service using an arbitrary name (specified by
externalNamein the spec) by returning a CNAME record with the name. No proxy is used. This type requires v1.7 or higher ofkube-dns.

A Service routes traffic across a set of Pods. Services are the abstraction that allow pods to die and replicate in Kubernetes without impacting your application. Discovery and routing among dependent Pods (such as the frontend and backend components in an application) is handled by Kubernetes Services.
Services match a set of Pods using labels and selectors, a grouping primitive that allows logical operation on objects in Kubernetes. Labels are key/value pairs attached to objects and can be used in any number of ways:
- Designate objects for development, test, and production
- Embed version tags
- Classify an object using tags

Kubernetes Object Model
Kubernetes has a very rich object model, representing different persistent entities in the Kubernetes cluster. Those entities describe:
- What containerized applications we are running and on which node
- Application resource consumption
- Different policies attached to applications, like restart/upgrade policies, fault tolerance, etc.
With each object, we declare our intent spec section. The Kubernetes system manages the status section for objects, where it records the actual state of the object. At any given point in time, the Kubernetes Control Plane tries to match the object’s actual state to the object’s desired state.
Examples of Kubernetes objects are Pods, ReplicaSets, Deployments, Namespaces, etc.
When creating an object, the object’s configuration data section from below the spec field has to be submitted to the Kubernetes API server. The spec section describes the desired state, along with some basic information, such as the object’s name. The API request to create an object must have the spec section, as well as other details. Although the API server accepts object definition files in a JSON format, most often we provide such files in a YAML format which is converted by kubectl in a JSON payload and sent to the API server.
Below is an example of a Deployment object’s configuration in YAML format:
apiVersion: apps/v1
kind: Deployment
metadata:
  name: nginx-deployment
  labels:
    app: nginx
spec:
  replicas: 3
  selector:
    matchLabels:
      app: nginx
  template:
    metadata:
      labels:
        app: nginx
    spec:
      containers:
      - name: nginx
        image: nginx:1.15.11
        ports:
        - containerPort: 80
The apiVersion field is the first required field, and it specifies the API endpoint on the API server which we want to connect to; it must match an existing version for the object type defined. The second required field is kind, specifying the object type - in our case it is Deployment, but it can be Pod, Replicaset, Namespace, Service, etc. The third required field metadata, holds the object’s basic information, such as name, labels, namespace, etc. Our example shows two spec fields (spec and spec.template.spec). The fourth required field spec marks the beginning of the block defining the desired state of the Deployment object. In our example, we want to make sure that 3 Pods are running at any given time. The Pods are created using the Pods Template defined in spec.template. A nested object, such as the Pod being part of a Deployment, retains its metadata and spec and loses the apiVersion and kind - both being replaced by template. In spec.template.spec, we define the desired state of the Pod. Our Pod creates a single container running the nginx:1.15.11 image from Docker Hub.
Deployment objects
Deployment objects provide declarative updates to Pods and ReplicaSets. The DeploymentController is part of the master node’s controller manager, and it ensures that the current state always matches the desired state. It allows for seamless application updates and downgrades through rollouts and rollbacks, and it directly manages its ReplicaSets for application scaling.
In the following example, a new Deployment creates ReplicaSet A which then creates 3 Pods, with each Pod Template configured to run one nginx:1.7.9 container image. In this case, the ReplicaSet A is associated with nginx:1.7.9 representing a state of the Deployment. This particular state is recorded as Revision 1.

Now, in the Deployment, we change the Pods’ Template and we update the container image from nginx:1.7.9 to nginx:1.9.1. The Deployment triggers a new ReplicaSet B for the new container image versioned 1.9.1 and this association represents a new recorded state of the Deployment, Revision 2. The seamless transition between the two ReplicaSets, from ReplicaSet A with 3 Pods versioned 1.7.9 to the new ReplicaSet B with 3 new Pods versioned 1.9.1, or from Revision 1 to Revision 2, is a Deployment rolling update.
A rolling update is triggered when we update the Pods Template for a deployment. Operations like scaling or labeling the deployment do not trigger a rolling update, thus do not change the Revision number.
Once the rolling update has completed, the Deployment will show both ReplicaSets A and B, where A is scaled to 0 (zero) Pods, and B is scaled to 3 Pods. This is how the Deployment records its prior state configuration settings, as Revisions.

Once ReplicaSet B and its 3 Pods versioned 1.9.1 are ready, the Deployment starts actively managing them. However, the Deployment keeps its prior configuration states saved as Revisions which play a key factor in the rollback capability of the Deployment - returning to a prior known configuration state. In our example, if the performance of the new nginx:1.9.1 is not satisfactory, the Deployment can be rolled back to a prior Revision, in this case from Revision 2 back to Revision 1 running nginx:1.7.9.
Volumes
As we know, containers running in Pods are ephemeral in nature. All data stored inside a container is deleted if the container crashes. However, the kubelet will restart it with a clean slate, which means that it will not have any of the old data.
To overcome this problem, Kubernetes uses Volumes. A Volume is essentially a directory backed by a storage medium. The storage medium, content and access mode are determined by the Volume Type.
In Kubernetes, a Volume is attached to a Pod and can be shared among the containers of that Pod. The Volume has the same life span as the Pod, and it outlives the containers of the Pod - this allows data to be preserved across container restarts.
Deployment
Basic commands
Like minikube, kubectl comes installed in the online terminal. The common format of a kubectl command is: kubectl action resource. This performs the specified action (like create, describe) on the specified resource (like node, container). You can use --help after the command to get additional info about possible parameters (kubectl get nodes --help).
Check the Information of Cluster
C:\Users\pc>kubectl version
Client Version: version.Info{Major:"1", Minor:"16+", GitVersion:"v1.16.6-beta.0", GitCommit:"e7f962ba86f4ce7033828210ca3556393c377bcc", GitTreeState:"clean", BuildDate:"2020-01-15T08:26:26Z", GoVersion:"go1.13.5", Compiler:"gc", Platform:"windows/amd64"}
Server Version: version.Info{Major:"1", Minor:"16+", GitVersion:"v1.16.6-beta.0", GitCommit:"e7f962ba86f4ce7033828210ca3556393c377bcc", GitTreeState:"clean", BuildDate:"2020-01-15T08:18:29Z", GoVersion:"go1.13.5", Compiler:"gc", Platform:"linux/amd64"}

C:\Users\pc>kubectl cluster-info
Kubernetes master is running at https://kubernetes.docker.internal:6443
KubeDNS is running at https://kubernetes.docker.internal:6443/api/v1/namespaces/kube-system/services/kube-dns:dns/proxy

To further debug and diagnose cluster problems, use 'kubectl cluster-info dump'.
Node Commands
Check the
namespaces:C:\Users\pc>kubectl get namespaces NAME STATUS AGE default Active 3d8h docker Active 3d8h kube-node-lease Active 3d8h kube-public Active 3d8h kube-system Active 3d8h kubernetes-dashboard Active 42hCheck nodes and the corresponding label:
 C:\Users\pc>kubectl get nodes --show-labels
 NAME             STATUS   ROLES    AGE    VERSION          LABELS
 docker-desktop   Ready    master   3d8h   v1.16.6-beta.0   beta.kubernetes.io/arch=amd64,beta.kubernetes.io/os=linux,kubernetes.io/arch=amd64,kubernetes.io/hostname=docker-desktop,kubernetes.io/os=linux,node-role.kubernetes.io/master=
Kubernetes Deployment
To deploy apps on Kubernetes, use:
kubectl create deployment
command. It reqiures the deployment name and app image location(including the full repository url for images hosted outside Docker Hub),
C:\Users\pc>kubectl create deployment kubernetes-bootcamp --image=gcr.io/google-samples/kubernetes-bootcamp:v1
deployment.apps/kubernetes-bootcamp created
To list your deployments use the get deploymentscommand:
C:\Users\pc>kubectl get deployments
NAME                  READY   UP-TO-DATE   AVAILABLE   AGE
kubernetes-bootcamp   0/1     1            0           68s
Check pod and working node
Pod
When making deployments, Kubernetes added one pod to make controll of the app instances. Pod is the abstration generated by Kubernetes, which indicates one group of or multiple application containers(Docker or rkt), and the sources shared by these containers. These sources includes:
- Shared storage, as volume
- Internet, as the only cluster IP address
- Information about the operation status of each container, for example, the version of the image used by the container and particular ports.
Pod is the atomic unit on the Kubernetes platform. When we create a Deployment on Kubernetes, the Deployment will create a Pod containing the container in it (rather than creating the container directly).Each Pod is bound to the working node that scheduled it and stays there until it terminates(depending on restart policy) or is deleted. If the work node fails, the same Pod is scheduled on other available work nodes in the cluster.

Use kubectl get command to look for existing pods.
C:\Users\pc>kubectl get pods
NAME                                   READY   STATUS         RESTARTS   AGE
kubernetes-bootcamp-69fbc6f4cf-8jx5c   0/1     ErrImagePull   0          29m
Next, to view what containers are inside that Pod and what images are used to build those containers we run the describe pods command:
C:\Users\pc>kubectl describe pods
Name:         kubernetes-bootcamp-69fbc6f4cf-8jx5c
Namespace:    default
Priority:     0
Node:         docker-desktop/192.168.65.3
Start Time:   Thu, 16 Jul 2020 17:42:50 +0800
Labels:       app=kubernetes-bootcamp
              pod-template-hash=69fbc6f4cf
Annotations:  <none>
Status:       Pending
IP:           10.1.0.138
IPs:
  IP:           10.1.0.138
Controlled By:  ReplicaSet/kubernetes-bootcamp-69fbc6f4cf
Containers:
  kubernetes-bootcamp:
    Container ID:
    Image:          gcr.io/google-samples/kubernetes-bootcamp:v1
    Image ID:
    Port:           <none>
    Host Port:      <none>
    State:          Waiting
      Reason:       ImagePullBackOff
    Ready:          False
    Restart Count:  0
    Environment:    <none>
    Mounts:
      /var/run/secrets/kubernetes.io/serviceaccount from default-token-vgwdh (ro)
Conditions:
  Type              Status
  Initialized       True
  Ready             False
  ContainersReady   False
  PodScheduled      True
Volumes:
  default-token-vgwdh:
    Type:        Secret (a volume populated by a Secret)
    SecretName:  default-token-vgwdh
    Optional:    false
QoS Class:       BestEffort
Node-Selectors:  <none>
Tolerations:     node.kubernetes.io/not-ready:NoExecute for 300s
                 node.kubernetes.io/unreachable:NoExecute for 300s
Events:
  Type     Reason     Age                   From                     Message
  ----     ------     ----                  ----                     -------
  Normal   Scheduled  30m                   default-scheduler        Successfully assigned default/kubernetes-bootcamp-69fbc6f4cf-8jx5c to docker-desktop
  Normal   Pulling    28m (x4 over 30m)     kubelet, docker-desktop  Pulling image "gcr.io/google-samples/kubernetes-bootcamp:v1"
  Warning  Failed     27m (x4 over 30m)     kubelet, docker-desktop  Failed to pull image "gcr.io/google-samples/kubernetes-bootcamp:v1": rpc error: code = Unknown desc = Error response from daemon: Get https://gcr.io/v2/: net/http: request canceled while waiting for connection (Client.Timeout exceeded while awaiting headers)
  Warning  Failed     27m (x4 over 30m)     kubelet, docker-desktop  Error: ErrImagePull
  Normal   BackOff    5m22s (x98 over 30m)  kubelet, docker-desktop  Back-off pulling image "gcr.io/google-samples/kubernetes-bootcamp:v1"
  Warning  Failed     27s (x118 over 30m)   kubelet, docker-desktop  Error: ImagePullBackOff
We see here details about the Pod’s container: IP address, the ports used and a list of events related to the lifecycle of the Pod.
Note: the describe command can be used to get detailed information about most of the kubernetes primitives: node, pods, deployments. The describe output is designed to be human readable, not to be scripted against.
Recall that Pods are running in an isolated, private network - so we need to proxy access to them so we can debug and interact with them. To do this, we’ll use the kubectl proxy command to run a proxy in a second terminal window.
C:\Users\pc>kubectl proxy
Starting to serve on 127.0.0.1:8001
There outputs a IP address which can be accessed through the browser. This time, we can open a new tab in the firfox or other browser to navigate to http://localhost:8001/api/v1/namespaces/kubernetes-dashboard/services/https:kubernetes-dashboard:/proxy/#/login. Then, there requires a Token to log in to the kubenetes dashboard. type
kubectl -n kube-system describe secret $(kubectl -n kube-system get secret | grep admin-user | awk '{print $1}')

Name:         vpnkit-controller-token-k5x42
Namespace:    kube-system
Labels:       <none>
Annotations:  kubernetes.io/service-account.name: vpnkit-controller
              kubernetes.io/service-account.uid: d0482b30-4e4a-4eaf-b436-2220bc8429c9

Type:  kubernetes.io/service-account-token

Data
====
namespace:  11 bytes
token:      eyJhbGciOiJSUzI1NiIsImtpZCI6IktXRXVUOFQ4V0xhZ21yQ1JHUmhuaXVuN2dFQnB6NTJaYVJpQUZKcWFtNXcifQ.eyJpc3MiOiJrdWJlcm5ldGVzL3NlcnZpY2VhY2NvdW50Iiwia3ViZXJuZXRlcy5pby9zZXJ2aWNlYWNjb3VudC9uYW1lc3BhY2UiOiJrdWJlLXN5c3RlbSIsImt1YmVybmV0ZXMuaW8vc2VydmljZWFjY291bnQvc2VjcmV0Lm5hbWUiOiJ2cG5raXQtY29udHJvbGxlci10b2tlbi1rNXg0MiIsImt1YmVybmV0ZXMuaW8vc2VydmljZWFjY291bnQvc2VydmljZS1hY2NvdW50Lm5hbWUiOiJ2cG5raXQtY29udHJvbGxlciIsImt1YmVybmV0ZXMuaW8vc2VydmljZWFjY291bnQvc2VydmljZS1hY2NvdW50LnVpZCI6ImQwNDgyYjMwLTRlNGEtNGVhZi1iNDM2LTIyMjBiYzg0MjljOSIsInN1YiI6InN5c3RlbTpzZXJ2aWNlYWNjb3VudDprdWJlLXN5c3RlbTp2cG5raXQtY29udHJvbGxlciJ9.1N7Ni4lyv6CYxIXMsT0LgEcq6zf32sqm915NVryDs9ASzyKttlcLQe4Sxeanz5KeTvISAcbt0YD3TvwyKQNiu52ywWWP-DWng9igBWPILaSGG-Qo2iE2fxHwCdI-jXnqNePHks74Sz2ejcBf_Qo5hR5E5hYDuW58MB6zK_-lYwPcIPlNHFk88viMpCgjUZ7r2Ha0JfzW0kLDRZk4bU70OULF2F_gnXypL_vhF7k4GQhj45xgyAtbepOAHWSn1LifwrdLkcTl177sb94rXYr4aZ36hWClgXxus_enYv6lfkCkUoKSleneRcTagtnhcOlcpczpEh1VMjwGZ6ipxy_PtQ
ca.crt:     1025 bytes
Next, there will be serveral tokens generated, input on of them, then, we will enter the dashboard.

Expose Applications
To list the service in the pods, use:
kubctl get service
C:\Users\pc>kubectl get service
NAME         TYPE        CLUSTER-IP   EXTERNAL-IP   PORT(S)   AGE
kubernetes   ClusterIP   10.96.0.1    <none>        443/TCP   4d1h
We have a Service called kubernetes that is created by default when docker-desktop starts the cluster. To create a new service and expose it to external traffic we’ll use the expose command with NodePort as parameter:
kubectl expose deployment/kubernetes-bootcamp --type="NodePort" --port 8080
Then, we get servive again:
kubectl get service
NAME                  TYPE        CLUSTER-IP      EXTERNAL-IP   PORT(S)          AGE
kubernetes            ClusterIP   10.96.0.1       <none>        443/TCP          4d1h
kubernetes-bootcamp   NodePort    10.108.238.95   <none>        8080:30586/TCP   10s
To find out what port was opened externally (by the NodePort option) we’ll run the describe service command:
C:\Users\pc>kubectl describe services/kubernetes-bootcamp
Name:                     kubernetes-bootcamp
Namespace:                default
Labels:                   app=kubernetes-bootcamp
Annotations:              <none>
Selector:                 app=kubernetes-bootcamp
Type:                     NodePort
IP:                       10.108.238.95
LoadBalancer Ingress:     localhost
Port:                     <unset>  8080/TCP
TargetPort:               8080/TCP
NodePort:                 <unset>  30586/TCP
Endpoints:
Session Affinity:         None
External Traffic Policy:  Cluster
Events:                   <none>
The Deployment created automatically a label for our Pod. With describe deployment command you can see the name of the label:
C:\Users\pc>kubectl describe deployment
Name:                   kubernetes-bootcamp
Namespace:              default
CreationTimestamp:      Thu, 16 Jul 2020 17:42:50 +0800
Labels:                 app=kubernetes-bootcamp
Annotations:            deployment.kubernetes.io/revision: 1
Selector:               app=kubernetes-bootcamp
Replicas:               1 desired | 1 updated | 1 total | 0 available | 1 unavailable
StrategyType:           RollingUpdate
MinReadySeconds:        0
RollingUpdateStrategy:  25% max unavailable, 25% max surge
Pod Template:
  Labels:  app=kubernetes-bootcamp
  Containers:
   kubernetes-bootcamp:
    Image:        gcr.io/google-samples/kubernetes-bootcamp:v1
    Port:         <none>
    Host Port:    <none>
    Environment:  <none>
    Mounts:       <none>
  Volumes:        <none>
Conditions:
  Type           Status  Reason
  ----           ------  ------
  Available      False   MinimumReplicasUnavailable
  Progressing    False   ProgressDeadlineExceeded
OldReplicaSets:  <none>
NewReplicaSet:   kubernetes-bootcamp-69fbc6f4cf (1/1 replicas created)
Events:          <none>
To delete Services you can use the delete service command. Labels can be used also here:
C:\Users\pc>kubectl delete service kubernetes-bootcamp
service "kubernetes-bootcamp" deleted

C:\Users\pc>kubectl get service
NAME         TYPE        CLUSTER-IP   EXTERNAL-IP   PORT(S)   AGE
kubernetes   ClusterIP   10.96.0.1    <none>        443/TCP   4d1h
Running Multople Instances of Apps
- Scaling an application
The Deployment created only one Pod for running our application. When traffic increases, we will need to scale the application to keep up with user demand.
Scaling is accomplished by changing the number of replicas in a Deployment.


Scaling out a Deployment will ensure new Pods are created and scheduled to Nodes with available resources. Scaling will increase the number of Pods to the new desired state. Kubernetes also supports autoscaling of Pods, Scaling to zero is also possible, and it will terminate all Pods of the specified Deployment.
Running multiple instances of an application will require a way to distribute the traffic to all of them. Services have an integrated load-balancer that will distribute network traffic to all Pods of an exposed Deployment. Services will monitor continuously the running Pods using endpoints, to ensure the traffic is sent only to available Pods.
Once you have multiple instances of an Application running, you would be able to do Rolling updates without downtime.
To list our deployments apply the command:
kubectl get deploymentsC:\Users\pc>kubectl get deployments NAME READY UP-TO-DATE AVAILABLE AGE kubernetes-bootcamp 0/1 1 0 17hThis shows:
- NAME lists the names of the Deployments in the cluster.
- READY shows the ratio of CURRENT/DESIRED replicas
- UP-TO-DATE displays the number of replicas that have been updated to achieve the desired state.
- AVAILABLE displays how many replicas of the application are available to your users.
- AGE displays the amount of time that the application has been running.
To see the ReplicaSet created by the Deployment, run
kubectl get rsC:\Users\pc>kubectl get rs NAME DESIRED CURRENT READY AGE kubernetes-bootcamp-69fbc6f4cf 1 1 0 17hNotice that the name of the ReplicaSet is always formatted as:
[DEPLOYMENT-NAME]-[RANDOM-STRING]The random string is randomly generated and uses the pod-template-hash as a seed. Two important columns of this command are:
- DESIRED displays the desired number of replicas of the application, which you define when you create the Deployment. This is the desired state.
- CURRENT displays how many replicas are currently running.
Next, let’s scale the Deployment to 4 replicas. We’ll use the
kubectl scalecommand, followed by the deployment type, name and desired number of instances:C:\Users\pc>kubectl scale deployments/kubernetes-bootcamp --replicas=4 deployment.apps/kubernetes-bootcamp scaledTo list your Deployments once again, use
get deployments:C:\Users\pc>kubectl get deployments NAME READY UP-TO-DATE AVAILABLE AGE kubernetes-bootcamp 0/4 4 0 17The change was applied, and we have 4 instances of the application available. Next, let’s check if the number of Pods changed:
 C:\Users\pc>kubectl get pods -o wide
 NAME                                   READY   STATUS             RESTARTS   AGE    IP           NODE             NOMINATED NODE   READINESS GATES
 kubernetes-bootcamp-69fbc6f4cf-8xbnj   0/1     ImagePullBackOff   0          74m    10.1.0.173   docker-desktop   <none>           <none>
 kubernetes-bootcamp-69fbc6f4cf-n4mtr   0/1     ImagePullBackOff   0          2m8s   10.1.0.176   docker-desktop   <none>           <none>
 kubernetes-bootcamp-69fbc6f4cf-pt96f   0/1     ImagePullBackOff   0          2m9s   10.1.0.175   docker-desktop   <none>           <none>
 kubernetes-bootcamp-69fbc6f4cf-xpkxl   0/1     ErrImagePull       0          2m8s   10.1.0.174   docker-desktop   <none>           <none>
There are 4
Podsnow, with differentIP addresses. The change was registered in the Deployment events log. To check that, use thedescribecommand:C:\Users\pc>kubectl describe deployments/kubernetes-bootcamp Name: kubernetes-bootcamp Namespace: default CreationTimestamp: Thu, 16 Jul 2020 17:42:50 +0800 Labels: app=kubernetes-bootcamp Annotations: deployment.kubernetes.io/revision: 1 Selector: app=kubernetes-bootcamp Replicas: 4 desired | 4 updated | 4 total | 0 available | 4 unavailable StrategyType: RollingUpdate inReadySeconds: 0 RollingUpdateStrategy: 25% max unavailable, 25% max surge Pod Template: Labels: app=kubernetes-bootcamp Containers: kubernetes-bootcamp: Image: gcr.io/google-samples/kubernetes-bootcamp:v1 Port: <none> Host Port: <none> Environment: <none> Mounts: <none> Volumes: <none> Conditions: Type Status Reason ---- ------ ------ Available False MinimumReplicasUnavailable Progressing True ReplicaSetUpdated OldReplicaSets: <none> NewReplicaSet: kubernetes-bootcamp-69fbc6f4cf (4/4 replicas created) Events: Type Reason Age From Message ---- ------ ---- ---- ------- Normal ScalingReplicaSet 3m26s deployment-controller Scaled up replica set kubernetes-bootcamp-69fbc6f4cf to 4You can also view in the output of this command that there are 4 replicas now.
To scale down the Service to 1 replicas, run again the scale command:
kubectl scale deployments/kubernetes-bootcamp --replicas=1When opening in the Kubernetes Dashboard, Theis command is equivalent to the operation below:

Scale Down - List the Deployments to check if the change was applied with the get deployments command:
 PS C:\Windows\system32> kubectl get deployments
 NAME                  READY   UP-TO-DATE   AVAILABLE   AGE
 kubernetes-bootcamp   0/1     1            0           20h
The number of replicas decreased to 1. List the number of Pods, with
get pods:C:\Windows\system32> kubectl get pods -o wide NAME READY STATUS RESTARTS AGE IP NODE NOMINATED NODE READINESS GATES kubernetes-bootcamp-69fbc6f4cf-8xbnj 0/1 ErrImagePull 0 4h6m 10.1.0.187 docker-desktop <none> <none>Performing a Rolling Update
Updating an application
Users expect applications to be available all the time and developers are expected to deploy new versions of them several times a day. In Kubernetes this is done with rolling updates. Rolling updates allow Deployments’ update to take place with zero downtime by incrementally updating Pods instances with new ones. The new Pods will be scheduled on Nodes with available resources.
Scaling our application to run multipul instances is a requirment for performing updates without affecting application availability. By default, the maximum number of Pods that can be unavailable during the update and the maximum number of new Pods that can be created, is one. Both options can be configured to either numbers or percentages (of Pods). In Kubernetes, updates are versioned and any Deployment update can be reverted to a previous (stable) version.
Rolling updates allow Deployments’ update to take place with zero downtime by incrementally updating Pods instances with new ones.


Similar to application Scaling, if a Deployment is exposed publicly, the Service will load-balance the traffic only to available Pods during the update. An available Pod is an instance that is available to the users of the application.
Rolling updates allow the following actions:
- Promote an application from one environment to another (via container image updates)
- Rollback to previous versions
- Continuous Integration and Continuous Delivery of applications with zero downtime
To update the image of the application to version 2, use the set image command, followed by the deployment name and the new image version:
C:\Users\pc>kubectl set image deployments/kubernetes-bootcamp kubernetes-bootcamp=jocatalin/kubernetes-bootcamp:v2 deployment.apps/kubernetes-bootcamp image updated- The command notified the Deployment to use a different image for your app and initiated a rolling update. Check the status of the new Pods, and view the old one terminating with the get pods command:
C:\Users\pc>kubectl get pods
NAME                                   READY   STATUS              RESTARTS   AGE
kubernetes-bootcamp-69fbc6f4cf-8xbnj   0/1     ImagePullBackOff    0          4h29m
kubernetes-bootcamp-b4d9f565-77b9b     0/1     ContainerCreating   0          23s
Verify an Update
First, let’s check that the App is running. To find out the exposed IP and Port we can use:
describe sereviceC:\Users\pc>kubectl describe services/kubernetes-bootcamp Name: kubernetes-bootcamp Namespace: default Labels: app=kubernetes-bootcamp Annotations: <none> Selector: app=kubernetes-bootcamp Type: NodePort IP: 10.111.6.29 LoadBalancer Ingress: localhost Port: <unset> 8080/TCP TargetPort: 8080/TCP NodePort: <unset> 32703/TCP Endpoints: 10.1.0.188:8080 Session Affinity: None External Traffic Policy: Cluster Events: <none>The update can be confirmed also by running a rollout status command:
 C:\Users\pc>kubectl rollout status deployments/kubernetes-bootcamp
 deployment "kubernetes-bootcamp" successfully rolled out
To view the current image version of the app, run a describe command against the Pods:
```shell C:\Users\pc>kubectl describe pods Name: kubernetes-bootcamp-b4d9f565-77b9b Namespace: default Priority: 0 Node: docker-desktop/192.168.65.3 Start Time: Fri, 17 Jul 2020 14:38:53 +0800 Labels: app=kubernetes-bootcamp pod-template-hash=b4d9f565 Annotations:
Status: Running IP: 10.1.0.188 IPs: IP: 10.1.0.188 Controlled By: ReplicaSet/kubernetes-bootcamp-b4d9f565 Containers: kubernetes-bootcamp: Container ID: docker://f25cfbffbc2757eaaf37ae534d82a4ffbb919198e542812d0e5c876a10f18bd3 Image: jocatalin/kubernetes-bootcamp:v2 Image ID: docker-pullable://jocatalin/kubernetes-bootcamp@sha256:fb1a3ced00cecfc1f83f18ab5cd14199e30adc1b49aa4244f5d65ad3f5feb2a5 Port: Host Port: State: Running Started: Fri, 17 Jul 2020 14:44:59 +0800 Ready: True Restart Count: 0 Environment: Mounts: /var/run/secrets/kubernetes.io/serviceaccount from default-token-vgwdh (ro) Conditions: Type Status Initialized True Ready True ContainersReady True PodScheduled True Volumes: default-token-vgwdh: Type: Secret (a volume populated by a Secret) SecretName: default-token-vgwdh Optional: false QoS Class: BestEffort Node-Selectors: Tolerations: node.kubernetes.io/not-ready:NoExecute for 300s node.kubernetes.io/unreachable:NoExecute for 300s Events: Type Reason Age From Message Normal Scheduled 13m default-scheduler Successfully assigned default/kubernetes-bootcamp-b4d9f565-77b9b to docker-desktop Normal Pulling 13m kubelet, docker-desktop Pulling image "jocatalin/kubernetes-bootcamp:v2" Normal Pulled 7m38s kubelet, docker-desktop Successfully pulled image "jocatalin/kubernetes-bootcamp:v2" Normal Created 7m35s kubelet, docker-desktop Created container kubernetes-bootcamp Normal Started 7m33s kubelet, docker-desktop Started container kubernetes-bootcamp Rolling Back an Update
Let’s perform another update, and deploy image tagged as
v10:C:\Users\pc>kubectl set image deployments/kubernetes-bootcamp kubernetes-bootcamp=gcr.io/google-samples/kubernetes-bootcamp:v10 deployment.apps/kubernetes-bootcamp image updatedUse get deployments to see the status of the deployment:
 C:\Users\pc>kubectl get deployments
 NAME                  READY   UP-TO-DATE   AVAILABLE   AGE
 kubernetes-bootcamp   1/1     1            1           21h
And something is wrong… We do not have the desired number of Pods available. List the Pods again:
 C:\Users\pc>kubectl get pods
 NAME                                   READY   STATUS         RESTARTS   AGE
 kubernetes-bootcamp-6b4c55d8fc-cgw94   0/1     ErrImagePull   0          2m46s
 kubernetes-bootcamp-b4d9f565-77b9b     1/1     Running        0          19m
A describe command on the Pods should give more insights:
```shell C:\Users\pc>kubectl describe pods Name: kubernetes-bootcamp-6b4c55d8fc-cgw94 Namespace: default Priority: 0 Node: docker-desktop/192.168.65.3 Start Time: Fri, 17 Jul 2020 14:55:23 +0800 Labels: app=kubernetes-bootcamp pod-template-hash=6b4c55d8fc Annotations:
Status: Pending IP: 10.1.0.189 IPs: IP: 10.1.0.189 Controlled By: ReplicaSet/kubernetes-bootcamp-6b4c55d8fc Containers: kubernetes-bootcamp: Container ID: Image: gcr.io/google-samples/kubernetes-bootcamp:v10 Image ID: Port: Host Port: State: Waiting Reason: ImagePullBackOff Ready: False Restart Count: 0 Environment: Mounts: /var/run/secrets/kubernetes.io/serviceaccount from default-token-vgwdh (ro) Conditions: Type Status Initialized True Ready False ContainersReady False PodScheduled True Volumes: default-token-vgwdh: Type: Secret (a volume populated by a Secret) SecretName: default-token-vgwdh Optional: false QoS Class: BestEffort Node-Selectors: Tolerations: node.kubernetes.io/not-ready:NoExecute for 300s node.kubernetes.io/unreachable:NoExecute for 300s Events: Type Reason Age From Message Normal Scheduled 3m22s default-scheduler Successfully assigned default/kubernetes-bootcamp-6b4c55d8fc-cgw94 to docker-desktop Normal Pulling 70s (x4 over 3m19s) kubelet, docker-desktop Pulling image "gcr.io/google-samples/kubernetes-bootcamp:v10" Warning Failed 55s (x4 over 3m4s) kubelet, docker-desktop Failed to pull image "gcr.io/google-samples/kubernetes-bootcamp:v10": rpc error: code = Unknown desc = Error response from daemon: Get https://gcr.io/v2/: net/http: request canceled while waiting for connection (Client.Timeout exceeded while awaiting headers) Warning Failed 55s (x4 over 3m4s) kubelet, docker-desktop Error: ErrImagePull Warning Failed 30s (x6 over 3m4s) kubelet, docker-desktop Error: ImagePullBackOff Normal BackOff 17s (x7 over 3m4s) kubelet, docker-desktop Back-off pulling image "gcr.io/google-samples/kubernetes-bootcamp:v10" Name: kubernetes-bootcamp-b4d9f565-77b9b Namespace: default Priority: 0 Node: docker-desktop/192.168.65.3 Start Time: Fri, 17 Jul 2020 14:38:53 +0800 Labels: app=kubernetes-bootcamp pod-template-hash=b4d9f565 Annotations: Status: Running IP: 10.1.0.188 IPs: IP: 10.1.0.188 Controlled By: ReplicaSet/kubernetes-bootcamp-b4d9f565 Containers: kubernetes-bootcamp: Container ID: docker://f25cfbffbc2757eaaf37ae534d82a4ffbb919198e542812d0e5c876a10f18bd3 Image: jocatalin/kubernetes-bootcamp:v2 Image ID: docker-pullable://jocatalin/kubernetes-bootcamp@sha256:fb1a3ced00cecfc1f83f18ab5cd14199e30adc1b49aa4244f5d65ad3f5feb2a5 Port: Host Port: State: Running Started: Fri, 17 Jul 2020 14:44:59 +0800 Ready: True Restart Count: 0 Environment: Mounts: /var/run/secrets/kubernetes.io/serviceaccount from default-token-vgwdh (ro) Conditions: Type Status Initialized True Ready True ContainersReady True PodScheduled True Volumes: default-token-vgwdh: Type: Secret (a volume populated by a Secret) SecretName: default-token-vgwdh Optional: false QoS Class: BestEffort Node-Selectors: Tolerations: node.kubernetes.io/not-ready:NoExecute for 300s node.kubernetes.io/unreachable:NoExecute for 300s Events: Type Reason Age From Message Normal Scheduled 19m default-scheduler Successfully assigned default/kubernetes-bootcamp-b4d9f565-77b9b to docker-desktop Normal Pulling 19m kubelet, docker-desktop Pulling image “jocatalin/kubernetes-bootcamp:v2” Normal Pulled 13m kubelet, docker-desktop Successfully pulled image “jocatalin/kubernetes-bootcamp:v2” Normal Created 13m kubelet, docker-desktop Created container kubernetes-bootcamp Normal Started 13m kubelet, docker-desktop Started container kubernetes-bootcamp
There is no image called v10 in the repository. Let’s roll back to our previously working version. We’ll use the rollout undo command:
C:\Users\pc>kubectl rollout undo deployments/kubernetes-bootcamp
deployment.apps/kubernetes-bootcamp rolled back The rollout command **reverted the deployment to the previous known state (v2 of the image)**. Updates are versioned and **you can revert to any previously know state of a Deployment**. List again the Pods:
C:\Users\pc>kubectl get pods
NAME                                 READY   STATUS    RESTARTS   AGE
kubernetes-bootcamp-b4d9f565-77b9b   1/1     Running   0          21
Four Pods are running. Check again the image deployed on the them:
C:\Users\pc>kubectl describe pods
Name:         kubernetes-bootcamp-b4d9f565-77b9b
Namespace:    default
Priority:     0
Node:         docker-desktop/192.168.65.3
Start Time:   Fri, 17 Jul 2020 14:38:53 +0800
Labels:       app=kubernetes-bootcamp
              pod-template-hash=b4d9f565
Annotations:  <none>
Status:       Running
IP:           10.1.0.188
IPs:
  IP:           10.1.0.188
Controlled By:  ReplicaSet/kubernetes-bootcamp-b4d9f565
Containers:
  kubernetes-bootcamp:
    Container ID:   docker://f25cfbffbc2757eaaf37ae534d82a4ffbb919198e542812d0e5c876a10f18bd3
    Image:          jocatalin/kubernetes-bootcamp:v2
    Image ID:       docker-pullable://jocatalin/kubernetes-bootcamp@sha256:fb1a3ced00cecfc1f83f18ab5cd14199e30adc1b49aa4244f5d65ad3f5feb2a5
    Port:           <none>
    Host Port:      <none>
    State:          Running
      Started:      Fri, 17 Jul 2020 14:44:59 +0800
    Ready:          True
    Restart Count:  0
    Environment:    <none>
    Mounts:
      /var/run/secrets/kubernetes.io/serviceaccount from default-token-vgwdh (ro)
Conditions:
  Type              Status
  Initialized       True
  Ready             True
  ContainersReady   True
  PodScheduled      True
Volumes:
  default-token-vgwdh:
    Type:        Secret (a volume populated by a Secret)
    SecretName:  default-token-vgwdh
    Optional:    false
QoS Class:       BestEffort
Node-Selectors:  <none>
Tolerations:     node.kubernetes.io/not-ready:NoExecute for 300s
                 node.kubernetes.io/unreachable:NoExecute for 300s
Events:
  Type    Reason     Age   From                     Message

----    ------     ----  ----                     -------

  Normal  Scheduled  23m   default-scheduler        Successfully assigned default/kubernetes-bootcamp-b4d9f565-77b9b to docker-desktop
  Normal  Pulling    23m   kubelet, docker-desktop  Pulling image "jocatalin/kubernetes-bootcamp:v2"
  Normal  Pulled     17m   kubelet, docker-desktop  Successfully pulled image "jocatalin/kubernetes-bootcamp:v2"
  Normal  Created    17m   kubelet, docker-desktop  Created container kubernetes-bootcamp
  Normal  Started    17m   kubelet, docker-desktop  Started container kubernetes-bootcamp
Deploying an Application Using the Dashboard
Enter the Kubernetes Dashboard by typing the command:
kubectl proxy
Running this command will open up a browser with the Kubernetes Web UI, which we can use to manage containerized applications. By default, the dashboard is connected to the default Namespace. So, all the operations that we will do in this chapter will be performed inside the default Namespace.

- Deploy a webserver using the nginx:alpine image
From the dashboard, click on the CREATE tab at the top right corner of the Dashboard. That will open the create interface as seen below:

From that, we can create an application using a valid YAML/JSON configuration data of file, or manually from the CREATE AN APP section. Click on the CREATE AN APP tab and provide the following application details:
- The application name is webserver
- The Docker image to use is nginx:alpine, where alpine is the image tag
- The replica count, or the number of Pods, is 3
- No Service, as we will be creating it later.

By clicking on the Deploy button, we trigger the deployment. As expected, the Deployment webserver will create a ReplicaSet (webserver-74d8bd488f), which will eventually create three Pods (webserver-74d8bd488f-xxxxx).

Once we created the webserver Deployment, we can use the resource navigation panel from the left side of the Dashboard to display details of Deployments, ReplicaSets, and Pods in the default Namespace. The resources displayed by the Dashboard match one-to-one resources displayed from the CLI via kubectl.
List the Deployments We can list all the Deployments in the default Namespace using the kubectl get deployments command:
$ kubectl get deployments
NAME        READY   UP-TO-DATE   AVAILABLE   AGE
webserver   3/3     3            3           9m
List the ReplicaSets We can list all the ReplicaSets in the default Namespace using the kubectl get replicasets command:
$ kubectl get replicasets
NAME                   DESIRED   CURRENT   READY   AGE
webserver-74d8bd488f   3         3         3       9m
List the Pods We can list all the Pods in the default namespace using the kubectl get pods command:
$ kubectl get pods
NAME                          READY   STATUS    RESTARTS   AGE
webserver-74d8bd488f-dwbzz    1/1     Running   0          9m
webserver-74d8bd488f-npkzv    1/1     Running   0          9m
webserver-74d8bd488f-wvmpq    1/1     Running   0          9m
We can look at an object’s details using kubectl describe command. In the following example, you can see a Pod’s description:
$ kubectl describe pod webserver-74d8bd488f-dwbzz
Name:           webserver-74d8bd488f-dwbzz
Namespace:      default
Priority:       0
Node:           minikube/10.0.2.15
Start Time:     Wed, 15 May 2019 13:17:33 -0500
Labels:         k8s-app=webserver
                pod-template-hash=74d8bd488f
Annotations:    <none>
Status:         Running
IP:             172.17.0.5
Controlled By:  ReplicaSet/webserver-74d8bd488f
Containers:
  webserver:
    Container ID:   docker://96302d70903fe3b45d5ff3745a706d67d77411c5378f1f293a4bd721896d6420
    Image:          nginx:alpine
    Image ID:       docker-pullable://nginx@sha256:8d5341da24ccbdd195a82f2b57968ef5f95bc27b3c3691ace0c7d0acf5612edd
    Port:           <none>
    State:          Running
      Started:      Wed, 15 May 2019 13:17:33 -0500
    Ready:          True
    Restart Count:  0
We can delete any object using the kubectl delete command. Next, we are deleting the webserver Deployment we created earlier with the Dashboard:
$ kubectl delete deployments webserver
deployment.extensions "webserver" deleted
Deleting a Deployment also deletes the ReplicaSet and the Pods it created:
$ kubectl get replicasets
No resources found.

$ kubectl get pods
No resources found.
Deploying an Application Using the CLI
Let’s create the webserver.yaml file with the following content:
apiVersion: apps/v1
kind: Deployment
metadata:
  name: webserver
  labels:
    app: nginx
spec:
  replicas: 3
  selector:
    matchLabels:
      app: nginx
  template:
    metadata:
      labels:
        app: nginx
    spec:
      containers:
      - name: nginx
        image: nginx:alpine
        ports:
        - containerPort: 80
Then, we copy and paste the cods to the dashboard:

This will also create a ReplicaSet and Pods, as defined in the YAML configuration file.
$  kubectl get replicasets
NAME                  DESIRED   CURRENT   READY     AGE
webserver-b477df957   3         3         3         45s

$ kubectl get pods
NAME                        READY     STATUS    RESTARTS   AGE
webserver-b477df957-7lnw6   1/1       Running   0          2m
webserver-b477df957-j69q2   1/1       Running   0          2m
webserver-b477df957-xvdkf   1/1       Running   0          2m
Exposing an Application
Expose a Deployment with the kubectl expose command:
$ kubectl expose deployment webserver --name=web-service --type=NodePort
service/web-service exposed
List the Services:
kubectl get services
NAME                  TYPE        CLUSTER-IP     EXTERNAL-IP   PORT(S)          AGE
kubernetes            ClusterIP   10.96.0.1      <none>        443/TCP          4d8h
kubernetes-bootcamp   NodePort    10.111.6.29    <none>        8080:32703/TCP   5h48m
web-service           NodePort    10.98.238.30   <none>        80:32507/TCP     24m
Our web-service is now created and its ClusterIP is 10.98.238.30. In the PORT(S)section, we see a mapping of 80:32507, which means that we have reserved a static port 32507 on the node. If we connect to the node on that port, our requests will be proxied to the ClusterIP on port 80.
To get more details about the Service, we can use the kubectl describe command, as in the following example:
kubectl describe service web-service
Name:                     web-service
Namespace:                default
Labels:                   run=web-service
Annotations:              <none>
Selector:                 app=nginx
Type:                     NodePort
IP:                       10.98.238.30
LoadBalancer Ingress:     localhost
Port:                     <unset>  80/TCP
TargetPort:               80/TCP
NodePort:                 <unset>  32507/TCP
Endpoints:                10.1.0.193:80,10.1.0.194:80,10.1.0.195:80
Session Affinity:         None
External Traffic Policy:  Cluster
Events:                   <none>
web-service uses app=nginx as a Selector to logically group our three Pods, which are listed as endpoints. When a request reaches our Service, it will be served by one of the Pods listed in the Endpoints section
Accessing an Application
Our application is running on the Docker-desktop VM node. To access the application from our workstation, let’s first get the IP address of the Minikube VM:
Node
A Pod is always running on the work node.The work nodes are the computing machines in Kubernetes, which can be virtual machines or physical machines, depending on the cluster. Each work node is managed by the master node. The work node can have multiple pods, and the Kubernetes master node automatically handles scheduling pods on the work nodes in the cluster. Automatic scheduling of the master node takes into account the resources available on each work node.

2021 Update:
install and deploy K8s on Aliyun Ubuntu 20.0.4 ECS.
We have got :
Master 114.55.101.177
node1 47.102.132.205
node2 139.224.51.176
General uses for k8s
Namespace
In Kubernetes, namespaces provides a mechanism for isolating groups of resources within a single cluster. Names of resources need to be unique within a namespace, but not across namespaces. Namespace-based scoping is applicable only for namespaced objects (e.g. Deployments, Services, etc) and not for cluster-wide objects (e.g. StorageClass, Nodes, PersistentVolumes, etc).
When to use multiple namespaces
Namespaces are intended for use in environments with many users spread across multiple teams, or projects. For clusters with a few to tens of users, you should not need to create or think about namespaces at all. Start using namespaces when you need the features they provide.
Namespaces provide a scope for names. Names of resources need to be unique within a namespace, but not across namespaces. Namespaces cannot be nested inside one another and each Kubernetes resource can only be in one namespace.
Namespaces are a way to divide cluster resources between multiple users (via resource quota).
It is not necessary to use multiple namespaces to separate slightly different resources, such as different versions of the same software: use labels to distinguish resources within the same namespace.
After the creation of Kubernetes cluster, 4 default namespaces will be created:
# inspect all the namespaces
root@iZbp17v5lhpr4qztcxqu33Z:/data/k8s# kubectl get ns
NAME                   STATUS   AGE
default                Active   6h30m  # All the objects that were not assigned to a namespace are allocated in default namespace
kube-node-lease        Active   6h30m  # Heartbeat maintain, added after V1.13
kube-public            Active   6h30m  # All the clients can access this namespace (including the ones that were not assigned with token)
kube-system            Active   6h30m  # All the system resources created by kubernetes are kept in the namespace
kubernetes-dashboard   Active   165m  # k8s web dashboard
- Create, delete, check the namespace Check one particular namespace:
# check the designated namespace
root@iZbp17v5lhpr4qztcxqu33Z:/data/k8s# kubectl get ns default
NAME      STATUS   AGE
default   Active   6h35m
- Check the status of the namespace: Active, the namespace is in use, Terminating, the namespace is being deleted.
# Resource quota: the resources limitation for the namespace
# LimitRange: the resource limitatioon for every parts in namespace
root@iZbp17v5lhpr4qztcxqu33Z:/data/k8s# kubectl describe ns default
Name:         default
Labels:       kubernetes.io/metadata.name=default
Annotations:  <none>
Status:       Active

No resource quota.

No LimitRange resource.

# Then, we can create namespace
root@iZbp17v5lhpr4qztcxqu33Z:/data/k8s# kubectl create -f ns-dev.yaml
namespace/dev created
root@iZbp17v5lhpr4qztcxqu33Z:/data/k8s# kubectl get ns dev
NAME   STATUS   AGE
dev    Active   29s
root@iZbp17v5lhpr4qztcxqu33Z:/data/k8s# kubectl delete -f ns-dev.yaml
namespace "dev" deleted
Create, delete, check the namespace
root@iZbp17v5lhpr4qztcxqu33Z:/data/k8s# kubectl create ns dev
namespace/dev created
root@iZbp17v5lhpr4qztcxqu33Z:/data/k8s# kubectl get ns dev
NAME   STATUS   AGE
dev    Active   8s
root@iZbp17v5lhpr4qztcxqu33Z:/data/k8s# kubectl delete ns dev
namespace "dev" deleted
root@iZbp17v5lhpr4qztcxqu33Z:/data/k8s# kubectl get ns dev
Error from server (NotFound): namespaces "dev" not found
Prepare a yaml file
root@iZbp17v5lhpr4qztcxqu33Z:/data/k8s# cat ns-dev.yaml
apiVersion: v1
kind: Namespace
metadata:
        name: dev
Then, we can create namespace
root@iZbp17v5lhpr4qztcxqu33Z:/data/k8s# kubectl create -f ns-dev.yaml
namespace/dev created
root@iZbp17v5lhpr4qztcxqu33Z:/data/k8s# kubectl get ns dev
NAME   STATUS   AGE
dev    Active   29s
root@iZbp17v5lhpr4qztcxqu33Z:/data/k8s# kubectl delete -f ns-dev.yaml
namespace "dev" deleted
POD
Pods are the smallest deployable units of computing that you can create and manage in Kubernetes.
A Pod (as in a pod of whales or pea pod) is a group of one or more containers, with shared storage and network resources, and a specification for how to run the containers. A Pod’s contents are always co-located and co-scheduled, and run in a shared context. A Pod models an application-specific “logical host”: it contains one or more application containers which are relatively tightly coupled. In non-cloud contexts, applications executed on the same physical or virtual machine are analogous to cloud applications executed on the same logical host.
As well as application containers, a Pod can contain init containers that run during Pod startup. You can also inject ephemeral containers for debugging if your cluster offers this
The shared context of a Pod is a set of Linux namespaces, cgroups, and potentially other facets of isolation - the same things that isolate a Docker container. Within a Pod’s context, the individual applications may have further sub-isolations applied.
In terms of Docker concepts, a Pod is similar to a group of Docker containers with shared namespaces and shared filesystem volumes.
After the generation of cluster, all the components in cluster are run via Pod, which can be viewed through:
root@iZbp17v5lhpr4qztcxqu33Z:~# kubectl get pod -n kube-system
NAME                                              READY   STATUS    RESTARTS      AGE
coredns-7f6cbbb7b8-m7lbb                          1/1     Running   0             10h
coredns-7f6cbbb7b8-mn6zk                          1/1     Running   0             10h
etcd-izbp17v5lhpr4qztcxqu33z                      1/1     Running   0             10h
kube-apiserver-izbp17v5lhpr4qztcxqu33z            1/1     Running   3 (10h ago)   10h
kube-controller-manager-izbp17v5lhpr4qztcxqu33z   1/1     Running   7             10h
kube-flannel-ds-lbdz4                             1/1     Running   0             10h
kube-flannel-ds-s97zd                             1/1     Running   0             10h
kube-flannel-ds-vdh8q                             1/1     Running   0             10h
kube-proxy-k5xnq                                  1/1     Running   0             10h
kube-proxy-tn48w                                  1/1     Running   0             10h
kube-proxy-zpgb7                                  1/1     Running   0             10h
kube-scheduler-izbp17v5lhpr4qztcxqu33z            1/1     Running   7             10h
Create and run
# --image: decide the image for the Pod
# --port: decide the port run for the pod
# --namespace: decide the namespace for the Pod
root@iZbp17v5lhpr4qztcxqu33Z:~# kubectl run nginx --image=nginx:1.17.1 --port=80 --namespace=dev
pod/nginx created
Check the basic information for the Pod
 root@iZbp17v5lhpr4qztcxqu33Z:~# kubectl get pod -n dev
NAME    READY   STATUS    RESTARTS   AGE
nginx   1/1     Running   0          36s
Check the detailed information for the Pod
root@iZbp17v5lhpr4qztcxqu33Z:~# kubectl get pod -n dev -o wide
NAME    READY   STATUS    RESTARTS   AGE   IP           NODE                      NOMINATED NODE   READINESS GATES
nginx   1/1     Running   0          73s   10.244.1.4   izuf6hep6k903zyuzxb2kvz   <none>           <none>
Describe the information about the pod
root@iZbp17v5lhpr4qztcxqu33Z:~# kubectl describe pod nginx -n dev
Name:         nginx
Namespace:    dev
Priority:     0
Node:         izuf6hep6k903zyuzxb2kvz/172.27.41.194
Start Time:   Fri, 05 Nov 2021 21:58:15 +0800
Labels:       run=nginx
Annotations:  <none>
Status:       Running
IP:           10.244.1.4
IPs:
  IP:  10.244.1.4
Containers:
  nginx:
    Container ID:   docker://1747e3e0497c6b7bf99a2cbd2df7b461722d343c013e1709f07b237ee4ebc66b
    Image:          nginx:1.17.1
    Image ID:       docker-pullable://nginx@sha256:b4b9b3eee194703fc2fa8afa5b7510c77ae70cfba567af1376a573a967c03dbb
    Port:           80/TCP
    Host Port:      0/TCP
    State:          Running
      Started:      Fri, 05 Nov 2021 21:58:37 +0800
    Ready:          True
    Restart Count:  0
    Environment:    <none>
    Mounts:
      /var/run/secrets/kubernetes.io/serviceaccount from kube-api-access-pcpjn (ro)
Conditions:
  Type              Status
  Initialized       True
  Ready             True
  ContainersReady   True
  PodScheduled      True
Volumes:
  kube-api-access-pcpjn:
    Type:                    Projected (a volume that contains injected data from multiple sources)
    TokenExpirationSeconds:  3607
    ConfigMapName:           kube-root-ca.crt
    ConfigMapOptional:       <nil>
    DownwardAPI:             true
QoS Class:                   BestEffort
Node-Selectors:              <none>
Tolerations:                 node.kubernetes.io/not-ready:NoExecute op=Exists for 300s
                             node.kubernetes.io/unreachable:NoExecute op=Exists for 300s
Events:
  Type    Reason     Age    From               Message
  ----    ------     ----   ----               -------
  Normal  Scheduled  3m5s   default-scheduler  Successfully assigned dev/nginx to izuf6hep6k903zyuzxb2kvz
  Normal  Pulling    3m4s   kubelet            Pulling image "nginx:1.17.1"
  Normal  Pulled     2m43s  kubelet            Successfully pulled image "nginx:1.17.1" in 20.702306855s
  Normal  Created    2m43s  kubelet            Created container nginx
  Normal  Started    2m43s  kubelet            Started container nginx
Using yaml as definition
The following is an example of a Pod which consists of a container running the image
nginx:1.14.2.root@iZbp17v5lhpr4qztcxqu33Z:/data/k8s# cat pod-nginx.yaml apiVersion: v1 kind: Pod metadata: name: nginx namespace: dev spec: containers: - image: nginx: 1.17.1 imagePullPolicy: IfNotPresent name: Pod ports: - name: nginx-port containerPort: 80 protocol: TCP
To create the Pod shown above, run the following command:
kubectl apply -f pod.nginx.yaml
Pods are generally not created directly and are created using workload resources.
Labels
Labels are key/value pairs that are attached to objects, such as pods. Labels are intended to be used to specify identifying attributes of objects that are meaningful and relevant to users, but do not directly imply semantics to the core system. Labels can be used to organize and to select subsets of objects. Labels can be attached to objects at creation time and subsequently added and modified at any time. Each object can have a set of key/value labels defined. Each Key must be unique for a given object.
Motivation
Labels enable users to map their own organizational structures onto system objects in a loosely coupled fashion, without requiring clients to store these mappings.
Service deployments and batch processing pipelines are often multi-dimensional entities (e.g., multiple partitions or deployments, multiple release tracks, multiple tiers, multiple micro-services per tier). Management often requires cross-cutting operations, which breaks encapsulation of strictly hierarchical representations, especially rigid hierarchies determined by the infrastructure rather than by users
Example labels:
"release" : "stable","release" : "canary""environment" : "dev","environment" : "qa","environment" : "production""tier" : "frontend","tier" : "backend","tier" : "cache""partition" : "customerA","partition" : "customerB""track" : "daily","track" : "weekly"
Syntax and Character set
Labels are key/value pairs. Valid label keys have two segments: an optional prefix and name, separated by a slash (/). The name segment is required and must be 63 characters or less, beginning and ending with an alphanumeric character ([a-z0-9A-Z]) with dashes (-), underscores (_), dots (.), and alphanumerics between. The prefix is optional. If specified, the prefix must be a DNS subdomain: a series of DNS labels separated by dots (.), not longer than 253 characters in total, followed by a slash (/).
If the prefix is omitted, the label Key is presumed to be private to the user. Automated system components (e.g. kube-scheduler, kube-controller-manager, kube-apiserver, kubectl, or other third-party automation) which add labels to end-user objects must specify a prefix.
The kubernetes.io/ and k8s.io/ prefixes are reserved for Kubernetes core components.
Valid label value:
- must be 63 characters or less (can be empty),
- unless empty, must begin and end with an alphanumeric character (
[a-z0-9A-Z]), - could contain dashes (
-), underscores (_), dots (.), and alphanumerics between.
For example, here’s the configuration file for a Pod that has two labels environment: production and app: nginx :
apiVersion: v1
kind: Pod
metadata:
  name: label-demo
  labels:
    environment: production
    app: nginx
spec:
  containers:
  - name: nginx
    image: nginx:1.14.2
    ports:
    - containerPort: 80
Label selectors
Unlike names and UIDs, labels do not provide uniqueness. In general, we expect many objects to carry the same label(s).
Via a label selector, the client/user can identify a set of objects. The label selector is the core grouping primitive in Kubernetes.
The API currently supports two types of selectors: equality-based and set-based. A label selector can be made of multiple requirements which are comma-separated. In the case of multiple requirements, all must be satisfied so the comma separator acts as a logical AND (&&) operator.
The semantics of empty or non-specified selectors are dependent on the context, and API types that use selectors should document the validity and meaning of them.
Equality-based requirement
Equality- or inequality-based requirements allow filtering by label keys and values. Matching objects must satisfy all of the specified label constraints, though they may have additional labels as well. Three kinds of operators are admitted =,==,!=. The first two represent equality (and are synonyms), while the latter represents inequality. For example:
environment = production
tier != frontend
The former selects all resources with key equal to environment and value equal to production. The latter selects all resources with key equal to tier and value distinct from frontend, and all resources with no labels with the tier key. One could filter for resources in production excluding frontend using the comma operator: environment=production,tier!=frontend
One usage scenario for equality-based label requirement is for Pods to specify node selection criteria. For example, the sample Pod below selects nodes with the label “accelerator=nvidia-tesla-p100”.
apiVersion: v1
kind: Pod
metadata:
  name: cuda-test
spec:
  containers:
    - name: cuda-test
      image: "k8s.gcr.io/cuda-vector-add:v0.1"
      resources:
        limits:
          nvidia.com/gpu: 1
  nodeSelector:
    accelerator: nvidia-tesla-p100
Set-based requirement
Set-based label requirements allow filtering keys according to a set of values. Three kinds of operators are supported: in,notin and exists (only the key identifier). For example:
environment in (production, qa)
tier notin (frontend, backend)
partition
!partition
- The first example selects all resources with key equal to
environmentand value equal toproductionorqa. - The second example selects all resources with key equal to
tierand values other thanfrontendandbackend, and all resources with no labels with thetierkey. - The third example selects all resources including a label with key
partition; no values are checked. - The fourth example selects all resources without a label with key
partition; no values are checked.
Similarly the comma separator acts as an AND operator. So filtering resources with a partition key (no matter the value) and with environment different than qa can be achieved using partition,environment notin (qa). The set-based label selector is a general form of equality since environment=production is equivalent to environment in (production); similarly for != and notin.
Set-based requirements can be mixed with equality-based requirements. For example: partition in (customerA, customerB),environment!=qa.
API
label a resource and check the label of a resource:
root@iZbp17v5lhpr4qztcxqu33Z:/data/k8s# kubectl label pod nginx version=1.0 -n dev
pod/nginx labeled
root@iZbp17v5lhpr4qztcxqu33Z:/data/k8s# kubectl get pod nginx -n dev --show-labels
NAME    READY   STATUS    RESTARTS   AGE   LABELS
nginx   1/1     Running   0          13m   version=1.0
update the label of a resource:
root@iZbp17v5lhpr4qztcxqu33Z:/data/k8s# kubectl label pod nginx version=2.0 -n dev --overwrite
pod/nginx labeled
root@iZbp17v5lhpr4qztcxqu33Z:/data/k8s# kubectl get pod nginx -n dev --show-labels
NAME    READY   STATUS    RESTARTS   AGE   LABELS
nginx   1/1     Running   0          15m   version=2.0
remove a label for resouce:
root@iZbp17v5lhpr4qztcxqu33Z:/data/k8s# kubectl label pod nginx -n dev version-
pod/nginx labeled
root@iZbp17v5lhpr4qztcxqu33Z:/data/k8s# kubectl get pod -n dev --show-labels
NAME    READY   STATUS    RESTARTS   AGE   LABELS
nginx   1/1     Running   0          35m   <none>
Define a labe via yaml:
root@iZbp17v5lhpr4qztcxqu33Z:/data/k8s# cat pod-nginx.yaml
apiVersion: v1
kind: Pod
metadata:
    name: nginx
    namespace: dev
    labels:
      version: "3.0"
      env: "test"
spec:
    containers:
    - image: nginx:1.17.1
      imagePullPolicy: IfNotPresent
      name: pod
      ports:
      - name: nginx-port
        containerPort: 80
        protocol: TCP
root@iZbp17v5lhpr4qztcxqu33Z:/data/k8s# kubectl apply -f pod-nginx.yaml
pod/nginx configured
root@iZbp17v5lhpr4qztcxqu33Z:/data/k8s# kubectl get pods -n dev --show-labels
NAME    READY   STATUS    RESTARTS   AGE   LABELS
nginx   1/1     Running   0          41m   env=test,version=3.0
Deployment
A Deployment provides declarative updates for Pods and ReplicaSets.
You describe a desired state in a Deployment, and the Deployment Controller changes the actual state to the desired state at a controlled rate. You can define Deployments to create new ReplicaSets, or to remove existing Deployments and adopt all their resources with new Deployments.
Use Case
The following are typical use cases for Deployments:
- Create a Deployment to rollout a ReplicaSet. The ReplicaSet creates Pods in the background. Check the status of the rollout to see if it succeeds or not.
- Declare the new state of the Pods by updating the PodTemplateSpec of the Deployment. A new ReplicaSet is created and the Deployment manages moving the Pods from the old ReplicaSet to the new one at a controlled rate. Each new ReplicaSet updates the revision of the Deployment.
- Rollback to an earlier Deployment revision if the current state of the Deployment is not stable. Each rollback updates the revision of the Deployment.
- Scale up the Deployment to facilitate more load.
- Pause the Deployment to apply multiple fixes to its PodTemplateSpec and then resume it to start a new rollout.
- Use the status of the Deployment as an indicator that a rollout has stuck.
- Clean up older ReplicaSets that you don’t need anymore.
To create a deployment via yaml:
root@iZbp17v5lhpr4qztcxqu33Z:/data/k8s# cat deploy-nginx.yaml
apiVersion: apps/v1
kind: Deployment
metadata:
    name: nginx
    namespace: dev
spec:
    replicas: 3
    selector:
        matchLabels:
            run: nginx
    template:
        metadata:
            labels:
                run: nginx
        spec:
            containers:
            - image: nginx:1.17.1
              name: nginx
              ports:
              - containerPort: 80
                protocol: TCP
In this example:
A Deployment named
nginxis created, indicated by the.metadata.namefield.The Deployment creates three replicated Pods, indicated by the
.spec.replicasfield.The
.spec.selectorfield defines how the Deployment finds which Pods to manage. In this case, you select a label that is defined in the Pod template (app: nginx). However, more sophisticated selection rules are possible, as long as the Pod template itself satisfies the rule.Note: The
.spec.selector.matchLabelsfield is a map of {key,value} pairs. A single {key,value} in thematchLabelsmap is equivalent to an element ofmatchExpressions, whosekeyfield is “key”, theoperatoris “In”, and thevaluesarray contains only “value”. All of the requirements, from bothmatchLabelsandmatchExpressions, must be satisfied in order to match.The
templatefield contains the following sub-fields:- The Pods are labeled
app: nginxusing the.metadata.labelsfield. - The Pod template’s specification, or
.template.specfield, indicates that the Pods run one container,nginx, which runs thenginxDocker Hub image at version 1.14.2. - Create one container and name it
nginxusing the.spec.template.spec.containers[0].namefield.
- The Pods are labeled
Run kubectl get deployments to check if the Deployment was created.
If the Deployment is still being created, the output is similar to the following:
root@iZbp17v5lhpr4qztcxqu33Z:/data/k8s# kubectl create -f deploy-nginx.yaml
deployment.apps/nginx created
Run kubectl get deployments to check if the Deployment was created.
If the Deployment is still being created, the output is similar to the following:
root@iZbp17v5lhpr4qztcxqu33Z:/data/k8s# kubectl get deployment,pods -n dev
NAME                    READY   UP-TO-DATE   AVAILABLE   AGE
deployment.apps/nginx   3/3     3            3           75s

NAME                         READY   STATUS    RESTARTS   AGE
pod/nginx-66ffc897cf-7jtrt   1/1     Running   0          75s
pod/nginx-66ffc897cf-qp8l5   1/1     Running   0          75s
pod/nginx-66ffc897cf-w87gx   1/1     Running   0          75s
When you inspect the Deployments in your cluster, the following fields are displayed:
NAMElists the names of the Deployments in the namespace.READYdisplays how many replicas of the application are available to your users. It follows the pattern ready/desired.UP-TO-DATEdisplays the number of replicas that have been updated to achieve the desired state.AVAILABLEdisplays how many replicas of the application are available to your users.AGEdisplays the amount of time that the application has been running.
Notice how the number of desired replicas is 3 according to .spec.replicas field.
To see the labels automatically generated for each Pod, run kubectl get pods --show-labels. The output is similar to:
root@iZbp17v5lhpr4qztcxqu33Z:~# kubectl get pods -n dev --show-labels
NAME                     READY   STATUS    RESTARTS   AGE     LABELS
nginx-66ffc897cf-7jtrt   1/1     Running   0          3h58m   pod-template-hash=66ffc897cf,run=nginx
nginx-66ffc897cf-qp8l5   1/1     Running   0          3h58m   pod-template-hash=66ffc897cf,run=nginx
nginx-66ffc897cf-w87gx   1/1     Running   0          3h58m   pod-template-hash=66ffc897cf,run=nginx
The created ReplicaSet ensures that there are three nginx Pods.
Get details of the deployments:
root@iZbp17v5lhpr4qztcxqu33Z:~# kubectl describe deployments -n dev
Name:                   nginx
Namespace:              dev
CreationTimestamp:      Tue, 09 Nov 2021 11:24:07 +0800
Labels:                 <none>
Annotations:            deployment.kubernetes.io/revision: 1
Selector:               run=nginx
Replicas:               3 desired | 3 updated | 3 total | 3 available | 0 unavailable
StrategyType:           RollingUpdate
MinReadySeconds:        0
RollingUpdateStrategy:  25% max unavailable, 25% max surge
Pod Template:
  Labels:  run=nginx
  Containers:
   nginx:
    Image:        nginx:1.17.1
    Port:         80/TCP
    Host Port:    0/TCP
    Environment:  <none>
    Mounts:       <none>
  Volumes:        <none>
Conditions:
  Type           Status  Reason
  ----           ------  ------
  Available      True    MinimumReplicasAvailable
  Progressing    True    NewReplicaSetAvailable
OldReplicaSets:  <none>
NewReplicaSet:   nginx-66ffc897cf (3/3 replicas created)
Events:          <none>
Service
An abstract way to expose an application running on a set of Pods as a network service.
With Kubernetes you don’t need to modify your application to use an unfamiliar service discovery mechanism. Kubernetes gives Pods their own IP addresses and a single DNS name for a set of Pods, and can load-balance across them.
Motivation
Kubernetes Pods are created and destroyed to match the state of your cluster. Pods are nonpermanent resources. If you use a Deployment to run your app, it can create and destroy Pods dynamically.
Each Pod gets its own IP address, however in a Deployment, the set of Pods running in one moment in time could be different from the set of Pods running that application a moment later.
This leads to a problem: if some set of Pods (call them “backends”) provides functionality to other Pods (call them “frontends”) inside your cluster, how do the frontends find out and keep track of which IP address to connect to, so that the frontend can use the backend part of the workload?
Enter Services.
Service resources
In Kubernetes, a Service is an abstraction which defines a logical set of Pods and a policy by which to access them (sometimes this pattern is called a micro-service). The set of Pods targeted by a Service is usually determined by a selector. To learn about other ways to define Service endpoints, see Services without selectors.
For example, consider a stateless image-processing backend which is running with 3 replicas. Those replicas are fungible—frontends do not care which backend they use. While the actual Pods that compose the backend set may change, the frontend clients should not need to be aware of that, nor should they need to keep track of the set of backends themselves.
The Service abstraction enables this decoupling.
Cloud-native service discovery
If you’re able to use Kubernetes APIs for service discovery in your application, you can query the API server for Endpoints, that get updated whenever the set of Pods in a Service changes.
For non-native applications, Kubernetes offers ways to place a network port or load balancer in between your application and the backend Pods.
Create a service that can only be accessed inside cluster:
# Expose a Service
# This service can only be used by node1, node2 and master
root@iZbp17v5lhpr4qztcxqu33Z:~# kubectl expose deploy nginx -n dev --name=svc-nginx1 --type=ClusterIP --port=80 --target-port=80
service/svc-nginx1 exposed

# Check the exposed service
root@iZbp17v5lhpr4qztcxqu33Z:~# kubectl get service -n dev
NAME         TYPE        CLUSTER-IP       EXTERNAL-IP   PORT(S)   AGE
svc-nginx1   ClusterIP   10.100.145.250   <none>        80/TCP    15s
Create a service that can be accessed through out side world:
root@iZbp17v5lhpr4qztcxqu33Z:~# kubectl expose deploy nginx -n dev --name=svc-nginx2 --type=NodePort --port=80 --target-port=80 -n devservice/svc-nginx2 exposed# If we check the service, we can find that there is a port to be mapped root@iZbp17v5lhpr4qztcxqu33Z:~# kubectl get svc -n dev -o wideNAME TYPE CLUSTER-IP EXTERNAL-IP PORT(S) AGE SELECTORsvc-nginx1 ClusterIP 10.100.145.250 <none> 80/TCP 9m5s run=nginxsvc-nginx2 NodePort 10.107.190.174 <none> 80:32286/TCP 2m7s run=nginxThen, we can access the service provided by nginx through http://114.55.101.177:32286/